That said, we went on a spree to look for a free solution to schedule Gmail emails to be sent later, and stumbled upon a cool Google Script that can do exactly that without any limitations; called Gmail Delay Send. Of course, this script requires prior setup and it’s not as intuitive to use as those paid apps. But I can assure you that even a novice can easily set it up and using it should not be too much of a pain. Without further ado, let’s see how to schedule Gmail emails to be sent later using Gmail Delay Send. Note: We are going to tell you configuration options that are easiest to follow and make it a snap to start scheduling Gmail emails. If you want to configure things according to your needs, we have added a few help pages at the end of the article that will help you understand what you need to do.
Authorize Gmail Delay Send
You first need to enable the script in your Gmail account and give it permission to access your data similar to how you give permissions to other apps. Go to Gmail Delay Send main settings page and authorize the access to attach it with your Gmail account. You should bookmark this page as you will have to access it whenever you need to configure its settings in the future.
Configure Gmail Delay Send Settings
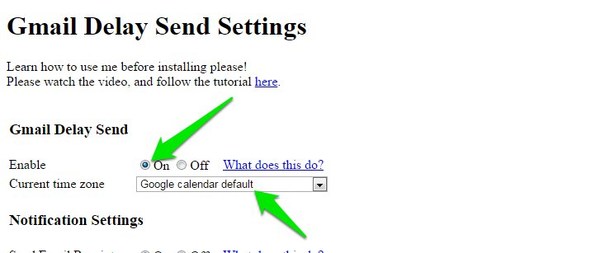
You must configure Gmail Delay Send before writing up your first scheduled email in Gmail. In the “Gmail Delay Send” section, you need to set “Enable” to “On” to make the script work in your Gmail account. There is also an option to set time zones, you can either select a different time zone based on the email receiver’s time zone or let Google calendar use your current timezone. No need to mess with this setting if the time zone isn’t a problem for you.
In the Advanced Settings section, select “Off” next to “Require label”. Gmail Delay Send is based on triggers to identify a scheduled email to be sent by searching for emails in your Gmail account. The “Trigger” option here defines the total time after which Gmail Delay Send will search your email for new emails to be scheduled. By default, it is set to 5min, but you can set it to 1min if you want to increase the accuracy. However, only set it to 1min if you really need the email to be delivered on time. This puts more pressure on Google servers which is bad for all the users of Gmail Delay send.
Now click on “Save Preferences” button below to save all the changes.
Schedule Your First Gmail Email
After configuring the settings, go to your Gmail account and open the compose window to write up a scheduled email. For testing purpose, you should enter your own email address in the “To” section. After that, enter the subject as you like and move to the body of the email.
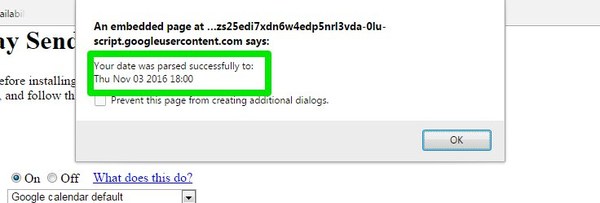
Now, this is the important part, you need to add a tiny text string at the start of the email that will tell Gmail Delay Send that it’s a scheduled email and what’s the exact time it should be sent. By default, it uses “@” as the identifying symbol and uses the date/time format that is understood by DateJS. For example, you need to type “@november 5th 12pm” at the start of the email to schedule an email for coming 5th November at 12PM. Entering the right date/time format is the biggest problem. Fortunately, DateJS is smart enough to understand most formats. Some of the example formats include next wednesday, sunday 6AM, october 24 2pm, 22nd 08:30 and other similar formats. To ensure that the format you are using is accepted by Gmail Delay Send, go to its “Settings” again. Here enter the format at the bottom under “Testing Resources” section and click on the “Parse Date” button. Gmail Delay Send will tell you whether the format is denied or accepted.
Now that you know how to set up the string, enter it at the start of the email and press “Enter” key to move to the next line. Make sure you press “Enter” and move to the next line as the first line is reserved for the string. After that enter your message and click on the cross button at the top to move it to the “Draft” section of Gmail. Gmail Delay Send will keep scanning this email draft and as soon as it detects that time has come, it will send it. Below is an example screenshot of how your email should look like.
Here are some helpful resources: Installation Guide Gmail Delay Send Settings Page Settings Page Complete Guide Email Format Guide
Conclusion
I found Gmail Delay Send to be very easy to set up and work with. Although entering the right date can be a little problem, but you can test it in its settings to ensure you don’t mess up. If there are any confusions or you have any questions regarding Gmail Delay Send, do let us know in the comments below.