In Android, Screen Recording can be done broadly in two ways. One way is to use a native Android application called “Screen recording” available on Android 11 and onwards. Another way is to use third-party screen recording apps. The Android native “Screen recording” has a very minimalistic and very easy-to-use interface, but is limited in functionality and is therefore good only for casual use. If screen recording is something you do regularly, then you should consider using a third-party screen-recording app. If you are using a device that is running on an operating system older than Android 11, then third-party apps are your only solution. In this article, I will discuss both methods and also explain the steps of using them. Let’s talk about the native method first.
1. “Screen recording” Android Native App
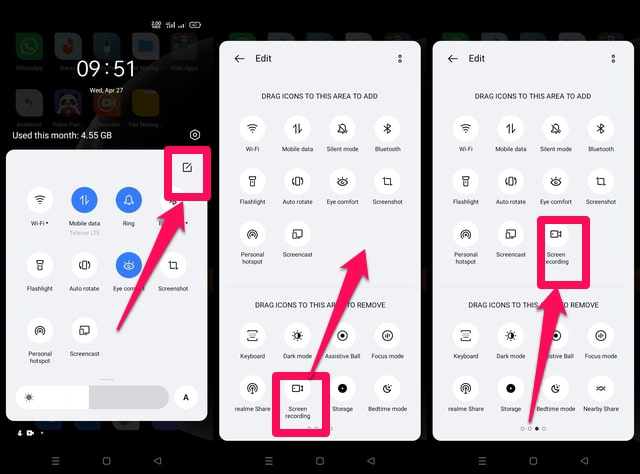
The main advantage of using the Android app native app is that it is ready to use without any need for downloading and installation. Also, as discussed before due to its minimal interface it is very simple to use. The app can be accessed from both the “Quick Settings” menu and the smart sidebar. Follow the following steps to add the “Screen recording” app to the “Quick Settings” menu, and then use it for recording. Step 1: Swipe down twice from the top of your screen to open and expand the “Quick Settings” menu. Step 2: Tap “Edit” in the top right corner of the “Quick Settings” menu and find the “Screen recording” app by swiping right. Step 3: Drag the“Screen recording” app to your Quick Settings.
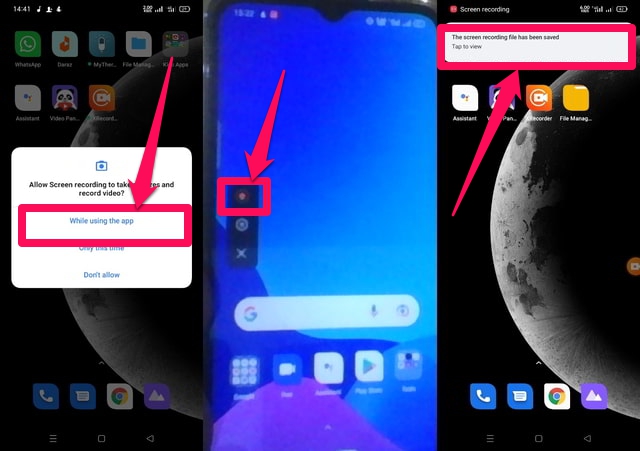
Step 4: Go back to the “Quick Settings” menu and tap on the “Screen recording” app to open it. Step 5: When you run the app, it will ask for your permission to record a video and take screenshots. Tap on the “While using this app” option to grant these permissions. Step 6: Tap on the small red button to start the recording. When the recording starts, this button will change into a red square shape button. Step 7: When the recording is complete, tap on the square shape red button to stop recording. The screen capture will be saved to your phone’s Gallery.
2. XRecorder App
As an example of a third-party app, I am using the “XRecorder” app. It is a powerful app that gives you many options to choose from, has a simple interface, and is free of cost without a lot of ads. Step 1: Download and install the”XRecorder” app. Step 2: Start the app and tap on the “Continue” button. Step 3: The app will ask for your permission to display on the top of other apps. Tap on the “Allow” button and then on the next screen scroll down, find the ” XRecorder” app and grant the required permission by tapping on the radio button in front of it.
Step 4: Give the app permission to access photos and media on your device by tapping on the “Allow” button. Step 5: In the main interface of the app will appear, click on the round plus button in the middle of the scene and then on the “Record Video” button.
Step 6: Grant the app, access to MIC by tapping on the “While using this app” option and then tap on “Ok” to continue. Step 7: Tap on the “START NOW” button to start the screen recording.
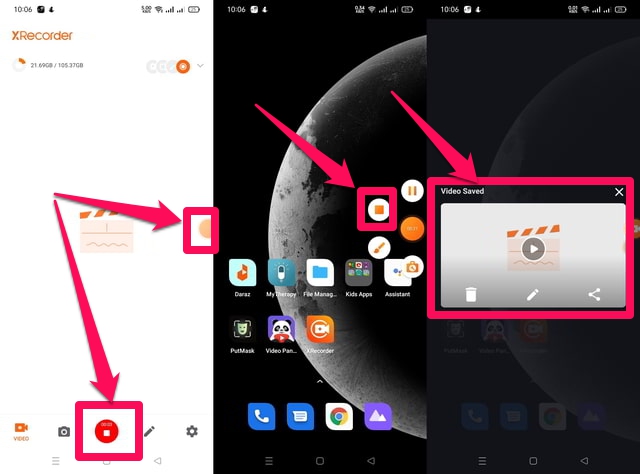
Step 8: The interface of the app is available to you all the time as a floating small orange circle on the screen. When you are done with your recording, tap on this circle and then on the small orange square button to stop the recording. Step 9: Lastly, a message will appear on the screen that your recording is saved. Tap on it to open and play the recorded file if desired.
Wrapping up
In this article, I have described step by step the use of both an Android inbuilt app and a third-party app for screen recording on an Android smartphone. An advantage of the native app is that you can use it without any trust or security concerns, but has limited functionality. As an alternative, the “XRecorder” a third-party app is very rich in features, but using it, a user might have security and privacy concerns. It is also important to note that the “XRecorder” app is free, but with ads.


